Produce Like a Nerd (2): You can do all of this with a DAW, can't you?…
In part 1 we have seen a toolchain that automates the production of a notation video with a reasonable backing track from a notation text file and a configuration file.
All of this is based on several open source programmes and a coordination programme called LilypondToBandVideoConverter [LTBVC] on the command line, hence it is not very interactive.
An obvious idea would be to combine the interactive approach of a DAW with the possibilities of this tool chain.
I shall show the procedure using the example of the DAW Reaper, but you could do this in similar form for other DAWs as long as those provide an API and you can port the scripts presented to that platform.
What we're doing is the following: we shall replicate the steps from the first part and have a look on how we can use the DAW intelligently for them. This will rely on scripts [LTBVC-Plugins] and plugins [SoXPlugins] I have written and provided via GitHub.
As an example we again take the demo song from part one. The GitHub link also provides the corresponding Reaper demo project, which we will use in this part.
Structuring the Project
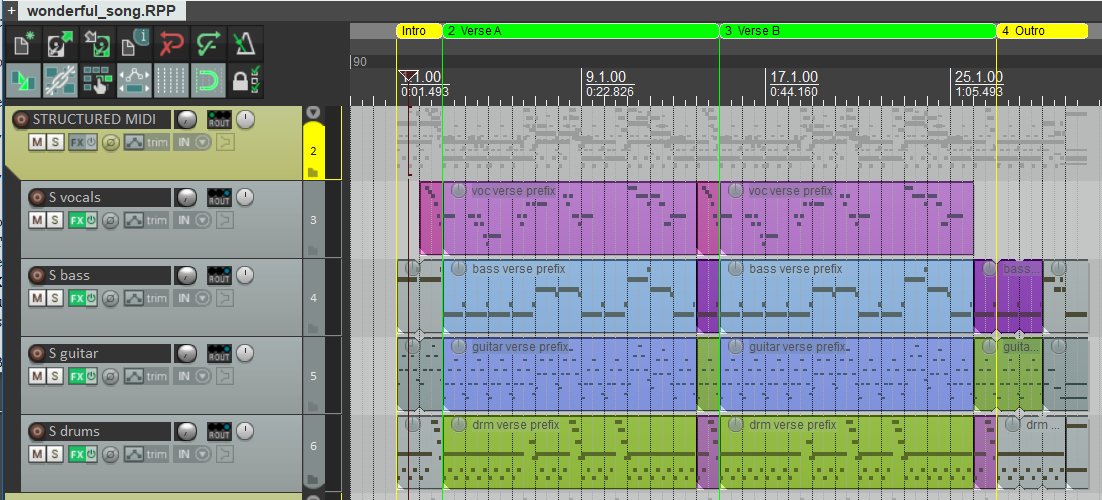
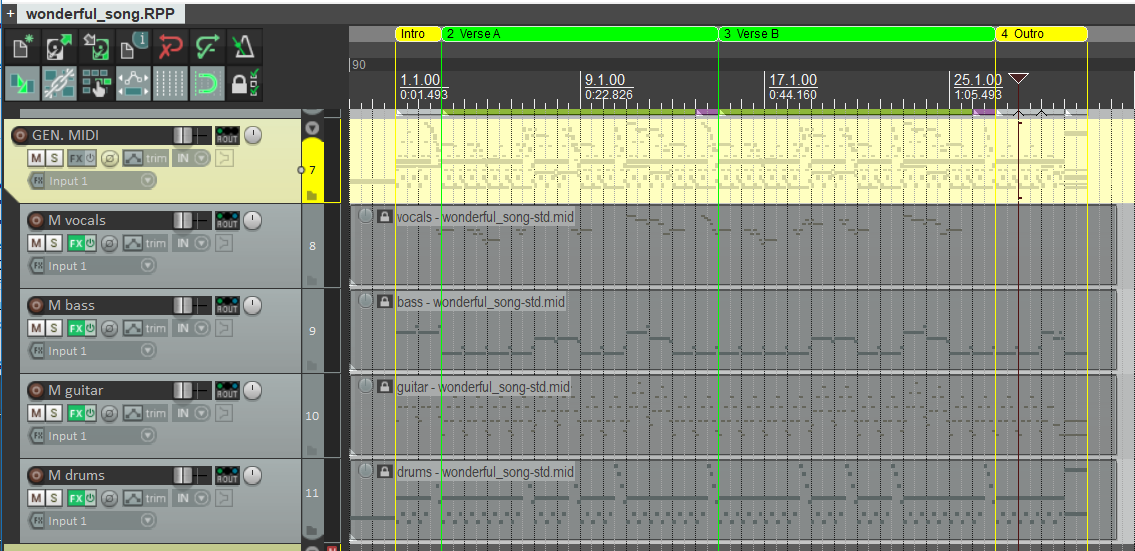
The notes for the four voices (bass, vocals, guitar, drums) are each collect in a single track of the DAW, but we split the notes into fragments within the tracks.
For an easier orientation on the time axis, we define regions for intro, verse 1 and 2 and the outro. This can normally be done by snapping your fingers, but we use a simple script for that, which derives those regions from a structure track.
From experience it is a lot easier to copy, move, rename or
colour MIDI items on a track than to manipulate regions
correspondingly. Hence we build such a structure track and
generate the regions from it via the action
MakeRegionsFromRegionStructureTrack. Position,
name and colours will be taken over from the MIDI items into
the regions (see figure 1).
It shows the simple structure of the demo song quite clearly.

Note Entry — Phases “extract”, “score” and “midi”
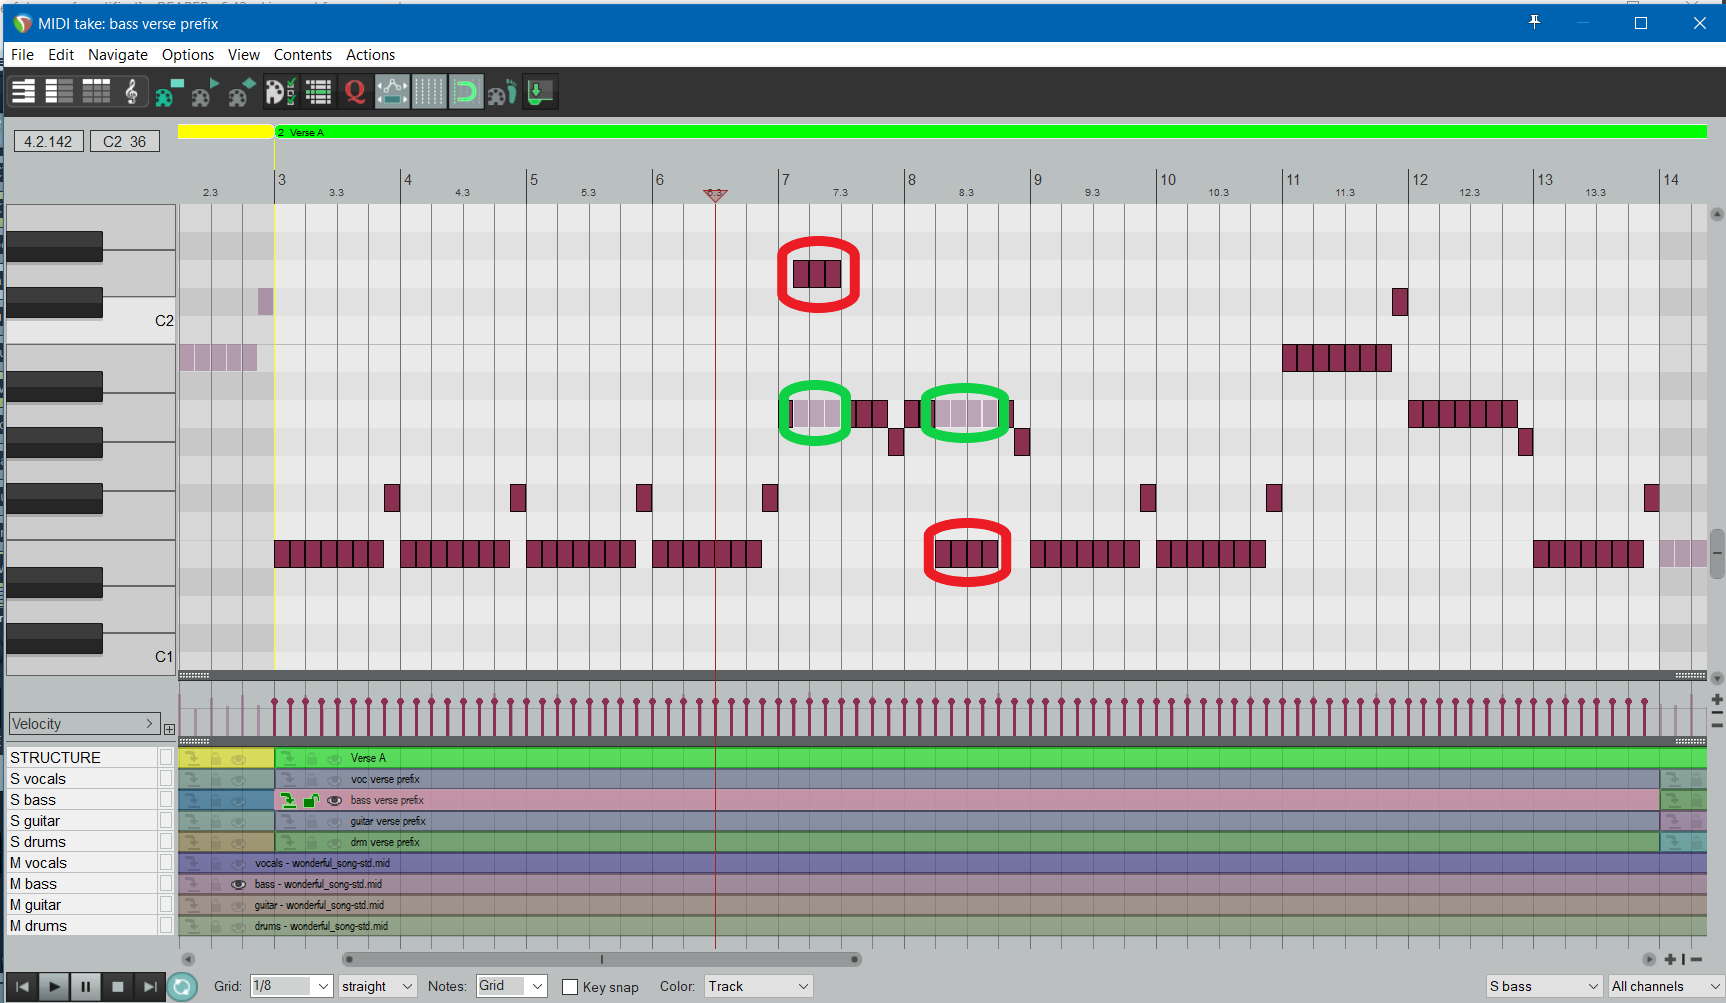
The demo song consists of several similar parts as one could easily see in part 1. In the DAW we enter the notes in the standard manner and make aliases (“pooled items”) for identical fragments, which then change synchronously upon a change in one of the connected fragments. For example, the notes in the bass for verse 1 and 2 are identical; hence an “original” and an “alias” is used. Figure 2 shows, how that looks for the song.
ltbvc Demo Song
But since the external tool chain relies heavily on the
lilypond program [Lilypond]: how do you get
to the note texts for the lilypond file? Do you have to type
them in manually somehow? No, there is another script for
that called ExportLilypond, which generates the
lilypond representation for a selected MIDI item.
Notes will be generated in English notation (which fits quite well to the convention of the external tool chain from part 1). This means, an f♯ (f sharp) will be notated as an “fs”, a e♭ (e flat) will be an “ef”. The algorithm analyses the MIDI notes from the note fragment along the measures and groups them into the minimal number of notes conformant to common notation guidelines. Chords will also be recognized automatically and correctly notated.
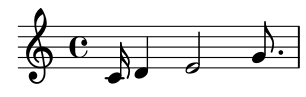
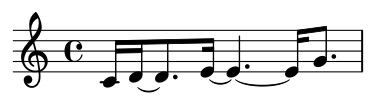
Each note will be split into (tied) partial notes that lie on raster positions of a measure where they may be located according to those guidelines. This sometimes leads to seemingly strange splits as you can see in figure 3a shows the original sequence, figure 3b the splitting by the script according to notation guidelines.
 |
 |
|
| (a) | (b) |
The start octave for the lilypond fragment depends on the
fragment name (indicating the instrument). For example, the
lilypond representation of a guitar fragment starts with the
lilypond text
“\relative c'” (=
C3), one for a bass fragment with
“\relative c” (=
C1).
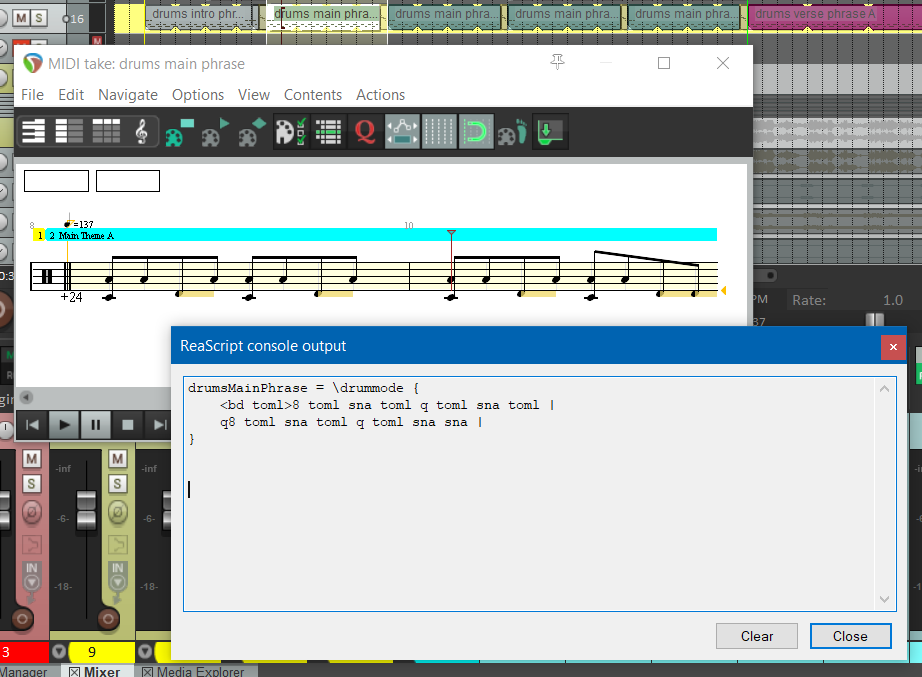
The result of applying the script on the bass verse is shown in figure 4. For a drum fragment automatically a drum notation is used (see figure 5).

Note that — compared to the notation in the first part — any repetitions are not automatically generated (“\repeat unfold 7 { a8 }); you will have to correct that manually.
It is also useful to normalise the notes input into the DAW. Typically you want to compare them with the externally generated MIDI file (for example, to check the effects of the humanisation settings).
For this normalisation the script
normalizeStructuredVoiceTracks has to be
executed; it scans all structured voice tracks (identifying
them via a naming convention), set all MIDI velocities to the
default 80, quantises the notes on the lilypond raster and
deletes all MIDI control codes for pan, volume and reverb,
because those settings will be defined in the external tool
chain via the configuration file.
So it is quite straightforward to gather the notes for the lilypond file and with it one can generate the voice extracts, the score, the silent video and the MIDI file.
Comparing the DAW Notes with the Generated MIDI File — “midi” Phase
Because you typically fiddle around with the notes in the lilypond file (for example, to extract common parts or notate the repetitions more intelligently), it could happen that the DAW notes do not fully match the generated MIDI file.
Of course, there are also differences caused by the humanisation for the MIDI file, but the difference to the normalised notes in the DAW is typically very small. If you want to check the tool chain, we are mainly interested in massive deviations (for example, that a note is in the wrong octave or that the song structure is completely divergent).
The MIDI file generated by the ltbvc could
be repeatedly imported into the DAW project, but this is
tedious, especially when those MIDI tracks are distributed
freely in the project. But once the import has been done
once, a script called ImportMidi helps
massively with the re-import.
The script relies on the predictable structure and the naming conventions for the tracks in the MIDI file generated. It scans the project for tracks according those conventions: having a single MIDI item, whose name ends with “.mid” and starts with voice name and MIDI file name.
Altogether is does the following: it reads the MIDI file into temporary tracks, updates existing tracks with the appropriate names and the deletes those temporary tracks. In the updated tracks all MIDI control codes for pan, volume and reverb are removed (because — as above — those values will later be defined by the song configuration). Finally those tracks are locked against accidental changes (they shall only be read or re-imported).
The four voices of the demo song need four MIDI tracks. Figure 6 shows the tracks and the MIDI items with the names conforming to the convention in the Reaper demo project.
Once you have imported those tracks you can typically compare the structured voice tracks from above with those imported tracks from the external tool chain. For example, in Reaper you can open the MIDI editor for such a structure tracks and additionally select the corresponding MIDI file track for a comparison.
Figure 7 shows such a comparison between a structured bass track and the related MIDI track. For demonstration purposes, some notes in the structured bass track were moved arbitrarily after having transferred them to the external tool chain: it is quite visible, that the tracks are not identical any longer (the moved notes have a red, the generated notes a green circle).
Intermediate Result (after “preprocess” Phase)
We have covered the first half of the processing phases (see figure 8. With a DAW we can export notes into lilypond (via “exportLilypond”), normalize the notes in structured voice tracks (via “normalizeStructuredVoiceTracks”) and also quickly import the generated MIDI file to compare it with the data in the DAW (via “importMidi”).
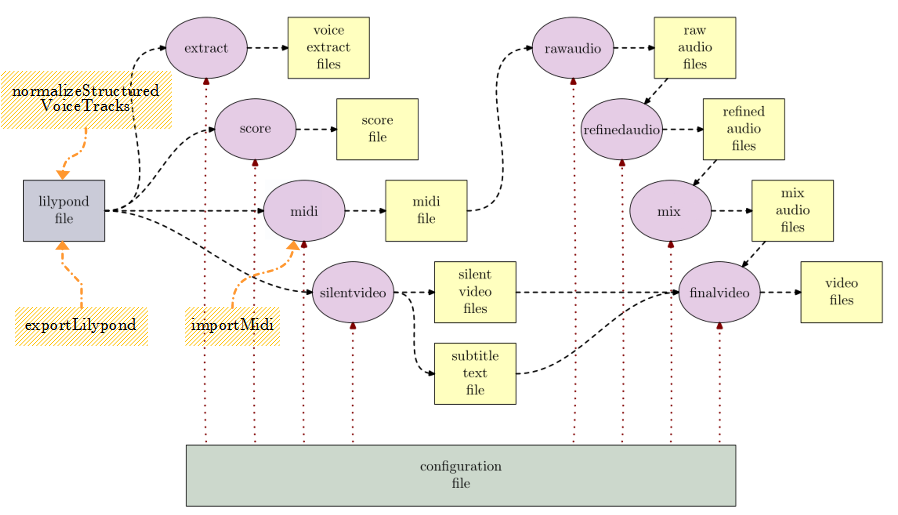
ltbvc
However, we have only arrived at the MIDI file and the silent video. Now the question arises how the audio generation can be supported. The aim must be that the result in the DAW is as close as possible to — and ideally identical with — the result of the external tool chain on the command line.
The idea is that plugins in the DAW transform MIDI data into audio data and apply effects to it in a form fully corresponding to the external tool chain.
In the following sections we will see, if this works and how.
Generation of Audio from MIDI Notes — Emulation of the “rawaudio” Phase
Well, it should not be too hard to make a DAW convert a MIDI track into audio: this is what it does all the time 😉
In principle, this is correct: you just add a conversion plugin to the track (very often a VSTi-Plugin), that takes MIDI and generates audio. And that's it.
But we do not want just any generated audio signal,
but one that is as close as possible to the audio file
generated in the tool chain via the programme
fluidsynth [Fluidsynth] using
a soundfont.
There were some previous efforts like Alexey Zhelezov's [FluidSynthVST] or Birch Labs' [JuicySFPlugin], but those are a bit tricky to use and support for them is unclear. But the main point is that even though they rely on the FluidSynth library, they do not exactly reproduce an external fluidsynth rendition of some MIDI data.
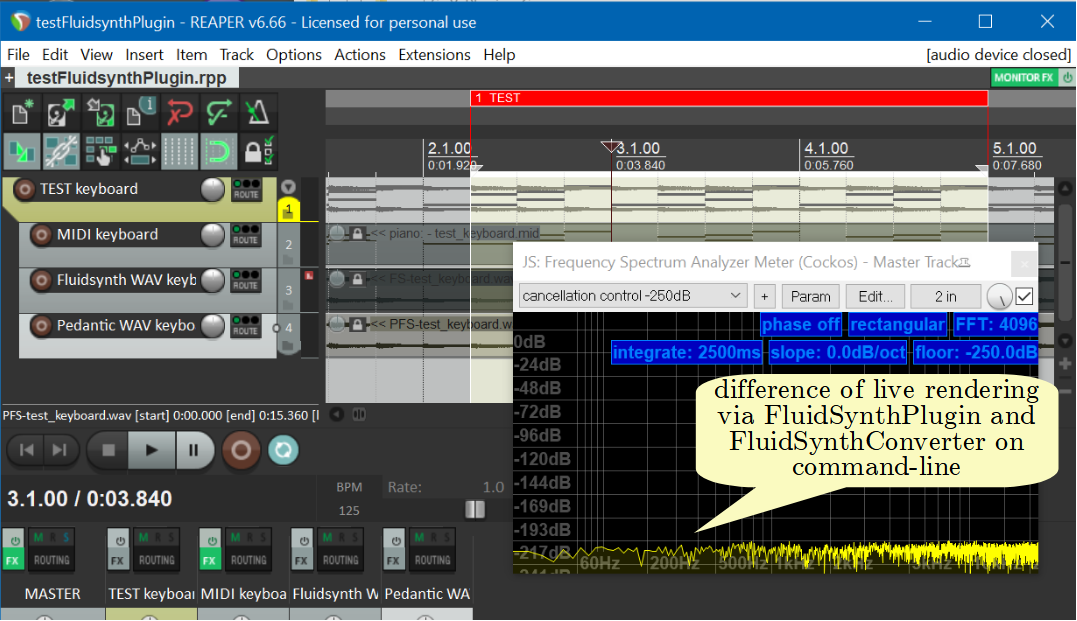
So I implemented two programs based on the FluidSynth library [FSPlugin]. The first component is a DAW plugin called FluidSynthPlugin. It has a simplistic interface where you specify a soundfont, several fluidsynth settings and possibly a MIDI program to be selected by putting text data in a text field. Then you are able to convert an incoming MIDI stream in a DAW to audio using the FluidSynth library.
Another tool circumvents some rasterization by the player of FluidSynth. That second component is a simplistic but pedantic command-line converter called FluidSynthConverter. It converts a MIDI file into a WAV file, is also based on the fluidsynth library and does the same sample-exact event feeding into that library as the plugin.
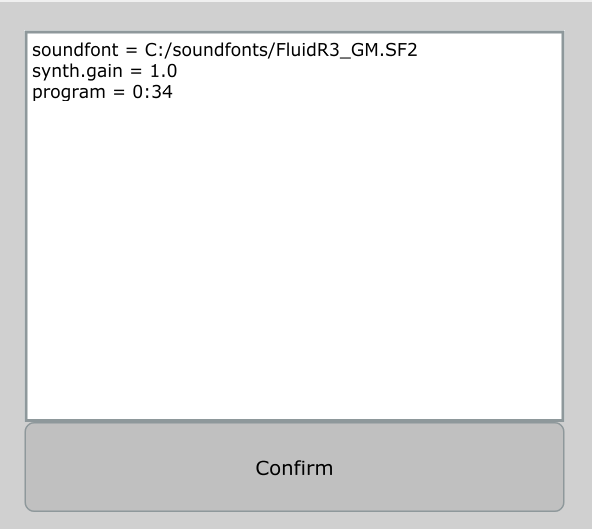
This means: a MIDI-track (or a structured voice track) has
fluidsynthplugin as its first effect and there
the exact MIDI instrument is selected, which has been
specified for the voice in the configuration file. If you
have specified there the MIDI instrument “34” for
the bass voice, then in fluidsynthplugin a
“Picked Bass” should be selected using the same
soundfont. Figure 9 shows that configuration according
to the configuration file for all voices of the demo
song.
Unfortunately there are some problems: when a soundfont uses so-called modulators, those will never be in sync with those in an external tool chain. Also plugins process audio data with a specific raster (the buffer size, for example, 64 samples); when internal and external raster are not completely congruent, the generated audio signal will not be identical. And that happens already when the start position of the DAW playback does not lie on such a raster position of the external generation.
Nevertheless for innocent soundfonts (without modulators and/or chorus) and some raster adaptation in the DAW the difference between DAW and external rendering is minimal. When using both components (command-line and DAW) on the same MIDI data they typically produce audio output with a difference of less than -200dBFS in a spectrum analysis (as shown in figure 10).
Effects from SoX as Plugins — Emulation of the “refinedaudio” Phase
Okay, if it is hard to transform MIDI notes into raw audio data in the DAW bitidentically to the external tool chain, then it is for sure completely hopeless to emulate the SoX effects in the DAW. SoX [SoX] does not provide any DAW-Plugins — it is just a command line programme — and arbitrary effects by other manufacturers are, of course, never bitidentical to those command-line effects.
Completely futile. Crap.
Until 2021, the situation was like that, but because I want to exactly emulate the command-line processing in the DAW, I wrote my own SoX-plugins for the bread-and-butter effects of SoX [SoXPlugins]. Those run on typical platforms and are freely available (for Windows, MacOSX and Linux).
The SoX effects allpass, band, bandpass, bandreject, bass, biquad, compand, equalizer, gain, highpass, lowpass, mcompand, overdrive, phaser, reverb, treble and tremolo are covered by that. They are grouped into six VST-plugins: Multiband-Compander, Filter, Gain, Overdrive, Reverb and Tremolo/Phaser.
All their parameters can be set by sliders and the ranges are identical to those in the SoX effects on the command-line. This needs some getting used to, because, for example, the compander threshold may be set to a minimum of -128dB or the phaser gain may be 1000 at most, but this is just intentional. Figure 11a shows the UI of the SoX-phaser, figure 11b the UI of one band in a SoX multiband compander.
 |
 |
|
| (a) | (b) |
So the aim for those plugins is not to provide overwhelming effects, but to emulate the command line effects from SoX.
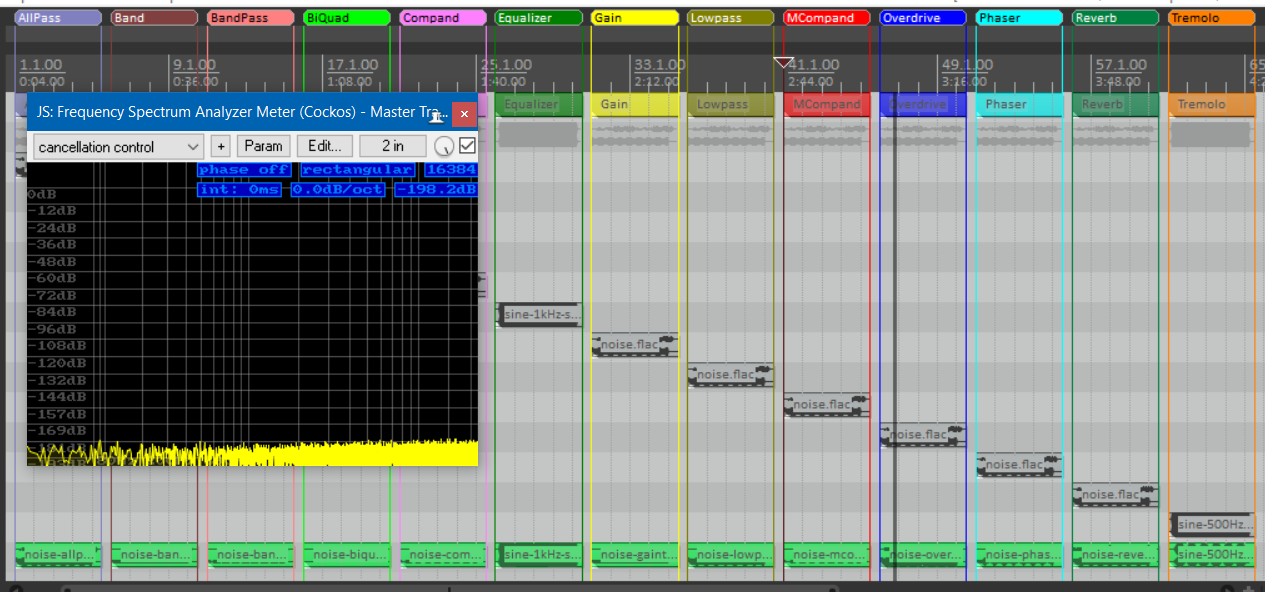
Although those plugins have been completely reimplemented, the deliver identical results to the existing SoX effect on the command line for each parameter combination. To check that at least for a random sample, the software package contains a test project, where — for each of the SoX effects above — audio fragments rendered via command line are compared with audio rendered in realtime by the SoX-plugins. This is done by adding the internal and externally rendered audio, but phase shifting one of the summands by 180° (a so-called “null-test”). They practically erase themselves completely, which means: they are identical. Strictly speaking they have a deviation of less than -150dB when doing a spectral analysis, you can only hear that with golden ears 😉 (see figure 12).
Ha, plugin master, now I have caught you in a lie after all: You have two modulation effects tremolo and phaser; those, for sure, do not run in-sync internally with some external tool chain. So nothing with “bitidentical”, right?
In principle, this is correct thinking — and we already had that when discussing the audio generation from MIDI in the previous section —: if some externally generated audio snippet with modulation were at an arbitrary position in the project, a modulation by a corresponding plugin would only be congruent by accident, typically it is out of phase. The reason for that is that plugins typically start their modulation when playback begins. This means technically the phase 0° of the modulation is on the time of playback start.
Figure 13 show that situation for an example. We assume a tremolo effect that is applied to a fragment in an audio track starting at time tfragment in the DAW. Also the playback in the DAW is assumed to start at time tplay. As one can easily find out,the modulation for the externally processed fragment (that just puts a tremolo on the original snippet) has its phase 0° exactly at time tfragment. However, the internal effect in the DAW has its phase 0° at time tplay (see also the red dots on the respective tracks marking the phase 0° positions). This would lead to massive differences between externally and internally generated audio.
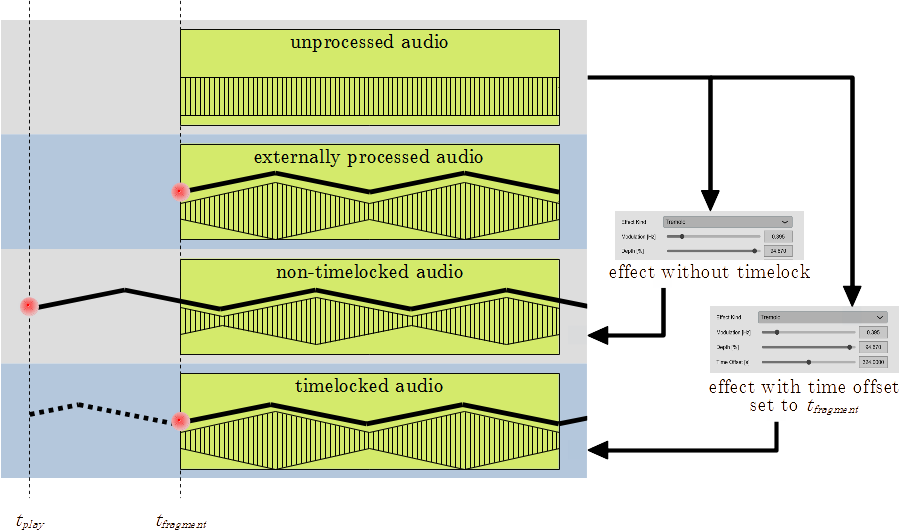
But it can be rectified by defining for the internal effect at which point in time the modulation phase should be 0° (so-called “timelocking”). If you set this to tfragment, the modulations will be synchronous (as you can see when comparing the second with the lowest track). Of course, the effect starts at tplay, but its modulation phase is shifted such that it reaches phase 0° exactly at tfragment.
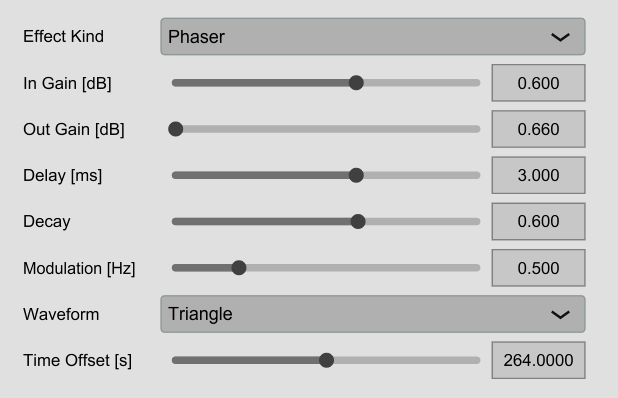
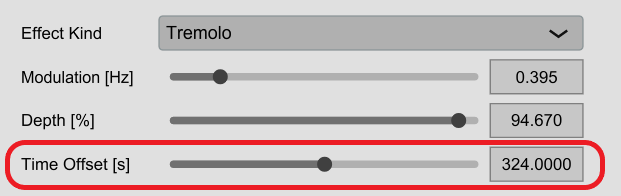
Figure 14 shows, for example, how to set this reference
time for the SoX tremolo effect. The parameter
Time Offset will be set to the above
time tfragment (we assume that this is the
position 324,0s), to be synchronous to the external
modulation.
If you configure the external effect chain in SoX and the internal chain in the DAW identically with the same parameter values and also adds the time shifts as shown above for modulations, there are no deviations at all between external and internal audio (precisely it is less than -150dB, see above; this is absolutely inaudible).
Well, even that is a little lie. When null testing sometimes you can hear deviations as ticks; this was caused by digital clipping in the external SoX programme that does not occur in the DAW plugins. Those use floating point arithmetic instead of the integer arithmetic used in SoX. However, the SoX programme signals that clipping in its error log; you just have to adapt the effect parameters accordingly to get rid of that clipping.
Mixing and Adding Audiotracks to Video — “mix” and “finalvideo” Phases
For mixing the audio tracks we do not need any special functions in a DAW: when there are voices in separate tracks of the DAW, their proportion of the total mix can be controlled via faders that should be set to the values in the configuration file.
And the silent video can often be put into its own track in a DAW — Reaper can handle that —; so it is easy to check how well it fits to the audio track (or vice versa).
What we do not have are the subtitles in the video for the measure numbers. They are dispensable: in a DAW we have a time clock that typically shows those measures anyway.
Conclusion and Final Remark
We are done!!
In part 1 we
have seen, how to use a text file for an arrangement in
Lilypond notation and a configuration file as inputs to fully
automatically generate several results: voice extracts,
score, MIDI file, audio files with effects and finally
notation vides. The process runs on the command-line using
common open-source-programmes and the coordination programme
ltbvc.
It is a bit tedious, but, however, it delivers usable results.
In this part 2 it was shown, that this process on the command line (a classical “edit-compile-run approach”) can be reasonably complemented by interaction with a DAW (see figure 15). You can
-
record the notes themselves in the DAW and transform then into text fragments for Lilypond (via “exportLilypond”),
-
quickly compare the externally generated and humanised MIDI file with the notes in the DAW (via “importMidi”),
-
produce audio from MIDI that is very close to the externally rendered audio (with a noise of -200dB), when some preconditions are obeyed,
-
apply DAW plugins (“SoXPlugins”) equivalent in output to the ones in the external effect chain from SoX, and
-
of course, use simple DAW services (like, for example, mixing voices via the volume faders).
There is some gap in the emulation with the DAW: currently it is hard to convert MIDI for complex soundfonts with modulation into audio both in a DAW and on the command line in an identical fashion. Here one must accept either to use simpler soundfonts or have some difference in modulations.

ltbvc
Wow, whoever has persevered to this point has my absolute respect: in the two parts of this article, you have seen a very extensive and complex process for making music arrangements and notation videos, but admittedly also a rather nerdy one (hence the title of this article).
For me this approach is perfect; maybe somebody can use it for himself or at least adapt parts of it for his context.
Of course, any feedback is welcome, whether positive or negative!